Pages

Showing posts with label recipe. Show all posts

Monday, May 7, 2012

Come Original

We've mentioned before that cooking and food are part of our culture. Not just because we're Mexican, but because we're Vazquezes... Vazquezi...Vazquezeseses? You get the point. We grew up on delicious home cooked meals. Our mom makes amazing Mexican classics and our dad loves to invent and is particularly fond of Italian food. This particular dish is a Vazquez original recipe, first thought of by our father and perfected by the entire family. So now we share it with you and we know you'll love it! (And if you don't, please seek help. There's something seriously wrong with you).

Pasta Brie


Ingredients:
  • 1 lb. Spaghetti
  • 3 roma tomatoes, cut into medium cubes
  • 1 medium white onion, coarsely chopped
  • 7.5 oz Brie cheese, cut into cubes about ¾ inch wide
  • 3 cloves garlic, finely chopped
  • A bunch of basil, chopped. Reserve some whole leaves for garnish
  • ½ cup dry white wine (Ex: Sauvignon blanc)
  • Grated Parmesan cheese
  • Salt and pepper
Preparation

Put the spaghetti to cook in a pot of boiling salted water. Keep checking on the pasta while your prepare the rest of the recipe. We want the pasta to be al dente when we mix it with the sauce.

While pasta is cooking, heat a small amount of olive oil in a large pan. Add in the chopped onion and sautee for about two minutes, then add the garlic. Cover the pan and let cook until the onion becomes transparent, stirring as needed so it does not stick or burn. Add in the white wine and turn the heat up to high to evaporate the alcohol in the wine. Add a dash of salt and pepper, then cover and let it sit over low heat.

Just before the pasta is al dente and ready to be strained, add in the cubes of Brie cheese, diced tomato and chopped basil to the onion and wine. Let ingredients sit until the cheese melts. When the pasta is ready, set aside one cup of the water before straining. You can use this in the sauce if you need to moisten it up a little.

Strain the pasta and add it to large pan with the sauce, mixing gently until all of the ingredients are well mixed and the pasta is evenly coated. It should have a pretty creamy constancy with the melted Brie cheese so add some of the pasta water here if you need to. Add in some grated Parmesan cheese and any more salt or pepper to taste.

Lastly and most deliciously, serve up the pasta, making sure your scoop up some of the sauce that may have settled to the bottom of the pan so that there is equal yumminess on each plate. Sprinkle with some more Parmesan cheese, garnish with a little basil leaf and enjoy! Oh and don't forget to serve yourself glass of that white wine and play a little music.

So what do you think? Since this is the first original recipe we post, you have to let us know if you try it out and how it went!

Bon appetit. Buen provecho. Brie!

Mariana and Paula

Thursday, April 19, 2012

Sangria Wine

We've mentioned our lovely Biggest Loser get togethers before, and this week, we were in charge of the refreshments. Enter a time-honored Vazquez tradition: SANGRIA!


Ingredients
  • Ice
  • 1 cup white rum
  • 5 key limes
  • 1/2 cup sugar
  • 1/2 cup water
  • 1 bottle red wine
  • 1/2 liter of sparkling water or club soda
  • Chopped fruit (watermelon, pineapple, berries, apple, pear, grapes)
Preparation

In a small saucepan over medium heat, mix sugar and water, stirring constantly until sugar is dissolved. Let cool. This creates a simple syrup which you'll use to sweeten the sangria.

Put a significant amount of ice in a large punch bowl. Add rum and shimmy to "burn" (that's what our father calls it, we don't know what it actually means, but do it). Add the juice of the five limes. You may want to have a couple more on hand in case you need to add more later. Slowly stir in the simple syrup then pour in the bottle of red wine and the 1/2 liter of sparkling water.

Chop as wide of a variety of fruit as you would like. This time we used watermelon, pineapple, and frozen berries, making it slightly tropical and delicious. Sangria often includes red apples, pears, and/or grapes, so you really can't go wrong. Mix the fruit into your yummy punch, serve in a tall glass, and enjoy!

Warning: Pace yourself! Although tasty and refreshing, it can be sneaky. Especially the rum-soaked fruit. Mmmm... rum-soaked fruit.

As always, here's a little music to accompany your sipping (or downing as the case may be).

Bon appetit! Buen provecho! Why is the rum always gone!

Sunday, April 8, 2012

Always Coming Back

So as you may have noticed, we haven't blogged in about 6 months. What can we say? We just kinda slacked off... But in the spirit of spring and Easter, we bring you the rebirth of The Man Hunger! And really by 'rebirth', we just mean we're going to start making an effort to blog again. Aren't you excited?!

On this lovely Easter day, we decided to make a nice brunch for our family. Didn't want to get too complicated but wanted to try something new. So here is the yummy menu for our Easter brunch!


Easter Brunch
Spinach & Ham Quiche | Rosemary Potatoes | Fruit Salad

Spinach & Ham Quiche
Ingredients
Crust:
  • 1 cup flour 
  •  1/2 teaspoon salt
  • 1/4 cup olive oil or canola oil
  • 1/4 cup cold water
Filling:
  • 6 large eggs, beaten
  • 1 1/2 cups heavy cream
  • Salt and pepper
  • 1 cup fresh baby spinach, packed
  • 6 oz Canadian bacon, diced and sauteed
  • 1 1/2 cups shredded Swiss cheese
  • 1 9-inch glass pie plate
Preparation
Preheat oven to 375 degrees F.

Crust:
Mix the flour and salt in a medium bowl with a fork. Then in a separate bowl using a whisk or fork, beat the oil and water to thicken. Add the liquid mixture in to the flour and mix until well incorporated. Press the dough into the pie plate, making sure it is evenly distributed and that there are no holes.

Filling:
Mix the eggs, heavy cream, salt and pepper in a blender for about 1 minute until well combined. Then layer the spinach, Canadian bacon and cheese and repeat. Slowly pour the egg mixture over the top, letting it settle in between all of the ingredients.


Carefully place in oven and bake for 35-45 minutes, until the egg mixture sets. Let cool for a bit then slice and serve!

Rosemary Potatoes

Ingredients
  • 6-8 red potatoes
  • Olive oil
  • 4 sprigs of fresh rosemary
  • Coarse salt
  • Pepper
Preparation
Wash the red potatoes thoroughly and remove any bad spots. Dice into approximately 1 inch pieces. In large pan, heat a couple tablespoons of olive oil and add potatoes.

Take two of the rosemary sprigs and remove the little leaves by running your fingers down the sprig in the opposite direction of the leaves' growth. Chop finely and add to the potatoes. Throw in the other two sprigs whole (for the aroma and taste). Add a couple pinches of the coarse salt and pepper to taste.


Turn the heat to low and cover the potatoes, turning them occasionally. Cook until the potatoes are soft. If they're cooked all the way through but not browned on the outside, you can uncover them, turn the heat up, and finish browning them. Remove the two whole rosemary sprigs before serving.

Fruit Salad

Ingredients and Preparation
You can really go wrong with fruit salad, so just purchase fruit that you like and in as wide of a variety as you want. Based on our taste and what was on sale, we used strawberries, pineapple, and pears for this. Chop fruit into bite-size pieces, toss in a bowl, and serve.

Note: If the fruit is tart, you can drizzle a little honey over the fruit and toss. A little goes a long way and will give the salad a touch of sweetness.

Easter brunch was served with mango or traditional orange juice mimosas, with strawberry slices dropped into each glass (and another strawberry for garnish).

So there you have it Hungertons! We're excited to be back and hope you're happy to hear from us again. We're also looking forward to re-starting Hungry For Men Wednesdays... oh, hot men, how we've missed you!

We hope you all had happy Easters, if you celebrated!


Bon Appetit! Buen Provecho! We're baaaack!

Mariana and Paula

PS - You didn't think that we forgot your music, did you?!
 

Monday, December 5, 2011

Strawberry Fields Forever

It has been positively freezing here in Tucson. I know, I know... there are places in the country that are much colder than us, but when you're used to the 80s and 70s and suddenly it drops into the 40s? It's brutal! So when I was trying to find something to bake for a certain someone's birthday, it figures I was drawn to a more summery treat. In celebration of my favoritest sister's birthday, I give you:

Paula's Birthday Strawberry Cookies


Ingredients
  • 2 cups strawberries, diced into 1/4-inch pieces
  • 1 teaspoon fresh lemon juice
  • 9 tablespoons granulated sugar
  • 2 cups all-purpose flour
  • 2 teaspoons baking powder
  • 1/2 teaspoon coarse salt
  • 6 tablespoons cold unsalted butter, cut into small pieces
  • 2/3 cup heavy cream

Preparation


Preheat oven to 375 degrees. Combine strawberries, lemon juice, and 2 tablespoons granulated sugar. Set aside.
 
Whisk together flour, baking powder, salt, and remaining 7 tablespoons granulated sugar in a large bowl. Add the butter in and rub the mixture with your fingers until it resembles coarse crumbs. Stir in cream until dough starts to come together, then stir in strawberry mixture. Using your hands the entire time to mix the ingredients helps it to come together more easily.

Using a tablespoon (or your hands!), drop dough onto a baking sheet lined with parchment, spacing them evenly. If they're very round, flatten them a little with a spoon so that the inside cooks properly. Bake for about 24-25 minutes, until golden brown. Transfer to a wire rack, and let cool. If you try to lift them from the parchment paper too soon, they'll stick, which we learned the hard way. Once they're cool enough to lift, enjoy with milk, coffee, or tea.

Happy birthday sissy wissy! I hope your dinner was fantastic (once again, thanks to Justin for helping make birthday dinners delicious successes) and that you enjoyed your cookies! Here's to a fantastic year for you! (And a little music never hurt).

Bon appetit! Buen provecho! Happy Birthday!

Mariana

Thursday, November 24, 2011

Return of the Mac

Here we are, at the Maloney house, in the midst of too many dogs, a cat that won't come out from under the couch and lots of hungry people. A perfect Thanksgiving! But we are very thankful to be surrounded by all this love and all of this great food!

Amidst the many adults, we have a couple of young children, as well a few adults that are still kids at heart. And what do kids love? Mac and cheese! So as a nice side dish, we made a big serving of homemade, baked macaroni and cheese! We haven't tried it yet but it smells fantastic! This will be a great dish for children, a cold night or just cause its awesome!

Baked Mac and Cheese


Ingredients:

  • 1 lb. Elbow macaroni
  • 3 cups Milk
  • 4 tbs. Butter
  • 1 Egg
  • 3 tbs. Flour
  • 1/2 tbs. Powdered mustard
  • 1/2 tsp Paprika
  • 1 bayleaf
  • 2 cups Sharp cheddar, shredded
  • 2 cups Mild cheddar, shredded
  • 1 tsp Salt
  • Black pepper, to taste
Preparation

Preheat oven to 350 degrees F.

In a large pot of boiling water (salted), cook the macaroni to al dente. Be careful not to overcook the pasta or you could end up with mushy noodles after you bake it.

In a medium saucepan, melt the butter. Add in the flour and mustard using a whisk and keep it moving until the mixture is smooth and free of any lumps. Stir in the milk, paprika and bay leaf. Simmer for 5 minutes, being careful not to boil the milk over, and remove the bay leaf.

Beat the egg in a small bowl. Carefully take about 1/2 cup on the milk mixture and slowly add it to the egg, constantly mixing it with a whisk. This helps bring the egg closer to the temperature of the milk mixture so that when you add it in, it doesn't just cook into a big scrambled mess! It is officially called "tempering an egg". Some of our fellow Hungertons may have known that, some of you may now be further impressed with our cooking skills! Add in your tempered egg to the milk mixture.

Reserve 1/2 cup of the mild cheddar and 1/2 cup of the sharp cheddar cheese and stir in the rest to the milk mixture, along with the salt and black pepper. Fold in the al dente macaroni pasta and pour into a casserole dish. Top with the reserved cheese.

Bake for 30 minutes, until bubbly and browned on top. Let rest for about 5 minutes and enjoy!


For your musical delight, we have a great classic which we hope you all remember and enjoy!

Thanks again for following us in our foodie ventures. We hope you all have a great Thanksgiving!

Bon appetit! Buen provecho! Yum!

Mariana and Paula

Sunday, November 20, 2011

Sprouts of Time

Brussels sprouts. We're not sure if there is another vegetable with a worse reputation than these little green bad boys. Justin hates them, Mariana likes them, and Paula has never even tried them. With Thanksgiving upon us and in an effort to see what kind of potential these sprouts have, we created a recipe for a side dish featuring the one and only Brussels sprouts (and maybe some bacon).

Bacon Brussels Sprouts


Ingredients
  • 2 lbs Brussels Sprouts, trimmed and halved
  • 1/2 lb Bacon, cut into 1/4" slices
  • 1/2 Medium red onion, sliced thinly
  • 1 tbs Minced garlic
  • 2 tsp lemon juice
  • 1/2 cup grated parmesan
  • 1 tbs Olive Oil
  • Salt and Pepper, to taste

Preparation

In our hunt for a good recipe, I uncovered some helpful tips on cooking sprouts. Food Blogga recommended "shocking" the sprouts, meaning moving them into a bowl of ice water after they have been drained to stop the cooking, helping them keep their vibrant color and keeping them from getting too mushy. So begin this dish by cooking the sprouts in a pot of boiling water, seasoned with about half a tablespoon of salt, for about 3 minutes and shocking them in ice water.

In a large wok or pan over medium high, heat the olive oil and add the garlic, bacon and onion slices in. Cook the bacon until nice and crispy. Then, very carefully drain as much of the bacon grease as possible or try soaking it up using a few paper towels.


Add in your sprouts to the pan and sauté everything for about 5 minutes or until the sprouts begin to get a nice golden brown to them. Finish up by seasoning with some salt and paper, and spinkling the parmesan cheese on top once plated on a serving dish.

The bacon sprouty wonders were a big hit at our last Biggest Loser viewing party and hopefully they will be a hit at your dinner table too!

And don't forget your music! (Caution: it's kind of a weird song...)

Bon appetit! Buen provecho! Sprouts!

Mariana and Paula

Sunday, November 13, 2011

Spaghetti Junction

In our household, spaghetti is considered a comfort food. It's warm, it's meaty, it's full of delicious carbs... what's not to like?! Justin and Mariana like to make it regularly, and have perfected their very own recipe. In fact, their wedding favors were little spice jars filled with oregano or chili flakes and accompanied by this recipe. For those of you who joined us that day (and hopefully joined the bride on the dance floor for a little Gaga, MJ, or Shout!), hopefully this is an oldie but goody! For those of you weren't there, we hope you enjoy it now!

 The Vazquez-Maloney Spaghetti

Ingredients
  • 1 package of spaghetti
  • 1 pound of lean ground meat or ground turkey
  • ¼ onion, chopped
  • 2-4 cloves of garlic, minced
  • 1 cup red wine
  • 1 can chopped tomatoes
  • 2 regular cans tomato sauce
  • Salt, to taste
  • Pepper, to taste
  • Oregano, to taste
  • Chili flakes, to taste

Optional Ingredients:
  • Garlic powder, to taste
  • Fine herbs, to taste

Preparation:

In a large saucepan, begin sautéing the ground meat with a little salt and pepper. When the meat is about halfway done, add the onion and garlic. Stir frequently. Once cooked, drain excess fat and remove the mixture from the saucepan.

In the same saucepan, pour the red wine. You can use stale wine if you have it, or open a new bottle. Let the wine cook off a little. As it’s doing so, scrape the bottom of the pan to lift the taste of the meat, onion, and garlic.

Next, add the one can of diced tomatoes and two cans of tomato sauce to the wine. Stir, then add the meat, onion, and garlic. Add herbs, salt, and chili flakes (and optional ingredients if you're using them) and stir. Let simmer.

Boil water with a couple pinches of salt. Add spaghetti and cook according to the instructions on the package.

While the spaghetti cooks, taste the sauce. Add more of the herbs, chili flakes, or salt if needed.

Strain spaghetti. In large bowl, mix spaghetti with enough sauce to coat the noodles. Serve, then spoon a little more sauce on top.

Enjoy with bread, red wine, and a little music!

Bon appetit! Buen provecho! Meaty carbs!

Mariana and Paula

Thursday, November 10, 2011

Jenny Artichoke Lived in a Boat...

We know, we know. We are totally slacking lately! But to make it up to you, we bring the scrumptious peace offering of...

Artichoke Dip
Unfortunately, we don't have a picture for you of this tasty treat cause in our haste to eat it all up, we forgot to take one!

Ingredients
  • 12 oz bag Frozen Artichokes, thawed or two cans of artichoke heart in water, strained
  • 2 Garlic clove
  • 1/4 c. Diced red onion
  • 1/2 c. Mayo
  • 1/2 c. Greek yogurt
  • 1/4 c. Parmesan cheese
  • 8 oz. Cream cheese
  • 1 tbs. White wine
  • 1 tsp. Salt
  • 1 tsp. Pepper
  • 1/2 tbs. Chili flakes
Preparation
  • Preheat oven to 375 degrees F.
  • Chop thawed artichoke hearts and the peeled garlic clove in a blender or food processor until fine.
  • Put artichoke and garlic in to a mixing bowl and add in the finely diced onion
  • Add the mayo, yogurt, Parm, cream cheese, white wine, chili flakes, salt and pepper. Mix together to blend well.
  • Place in a baking dish and bake for 20 minutes, until golden and bubbling on top.
We made this great recipe in a GCS free version for a friendly gathering at the beginning of the week and it was a great hit! It can be paired with crackers, chips or bread.

And though we may not have a picture to go with the recipe, we do have your song!

Bon apperit! Buen provecho! Yummy hearts!

Monday, October 24, 2011

I want my baby back...

Tonight is a special birthday edition of The Man Hunger. On this lovely day some many years ago, our very own Mariana was born into this world, ready to eat and be merry!

To celebrate, her favoritest sister and her favoritest husband worked together to bring a delicious birthday dinner to the table.

Mariana's Birthday Dinner
Pork back ribs, mashed potatoes, and asparagus

The recipe for the ribs came from a combination of recipes from one of our favorites, Sam the Cooking Guy. Justin was in charge of ribs, I was in charge of the sauce for the ribs and we made the birthday girl make her yummy mashed potatoes, which you will hear about later.

Pork Back Ribs
 First, we get Justin's way of preparing the ribs (as told by Justin and transcribed by Paula):
So one day, Shawn told me there were some ribs in fridge but they were Ted's and he told me to steal them while Ted wasn't around cause Ted was somewhere else, stealing from Chuck. But I didn't do anything for a few days until one day everyone left early, including me but not as early so I took the ribs and brought them home in my front seat and put them in the freezer.
About a year later, Paula decided she wanted to make ribs for Mariana's birthday and I said, 'Hey, I have some ribs in the freezer we could use." So I went and pondered the ribs, not knowing what they actually were, just thinking I knew I had a bag of ribby goodies. So I took them out the next day and I relized I still didn't know what they were. So I defrosted them. And I found they were pork back ribs. *Snoring* Oh, sorry!
I pondered lots of recipes so I decided I would make up my own. They call me the rib god. So I baked them for an hour and 15 minutes in the oven at 400 degrees. Wash the ribs off prior, removing all of the gunk off, place on a baking sheet and add about 4 tablespoons of cider vinegar, one in each corner of the baking sheet and cover with aluminum. Remove the ribs after an hour and half and place on the grill until you see grill marks and have a good crispiness. Then you can baste it with the sauce. Be sure to do this with a beer in your hand or nearby at all times.
Now Ted doesn't have any ribs to eat at his house.
He's a wild one that Maloney boy! Just to recap, here is how you prepare the ribs:
Preheat oven to 400 degrees F. Take a 3-4 pound rack of ribs, rinse and place on baking pan. Add 4 tablespoons of cider vinegar to the pan and cover tightly with aluminum foil. Place in oven and bake for an hour and half. Remove ribs from oven and carefully remove aluminum foil (there could be a lot of steam). On a gas or charcoal grill over medium heat, grill the rack of ribs until there are grill marks and a crisp outside has developed. Baste the ribs with sauce (recipe to follow), leave on for a couple more minutes, remove from grill and serve up promptly.


Honey-Garlic Sauce
For the sauce you will need:

  • 3/4 cup of honey
  • 3/4 cup of soy sauce
  • 3 cloves of garlic, crushed
  • 2 tablespoons of cider vinegar
  • 1 tablespoon of garlic powder
Combine all ingredients in a saucepan. Simmer for 5 minutes over low-medium heat. Any sauce left over after adding to the ribs can be served on the side for dipping.

Garlic Mashed Potatoes
Next, we will call upon the birthday girl for her very wonderful mashed potatoes:

Garlic mashed potatoes are my birthday tradition going all the way back to college (right Miss Mandy?), so it seemed fitting that they accompany the amazing ribs being cooked. For the potatoes, you will need:
  • 10 small red potatoes
  • 2 cloves of garlic
  • 2-3 tablespoons of butter
  • Milk
  • Salt
  • Pepper
  • Garlic powder
  • Cayenne pepper
Peel the potatoes, but leave some of the skin if you like your potatoes a little lumpy. Cut into quarters, throw into enough water to cover them and bring to a boil. Add a pinch of salt to the water and the garlic cloves. Boil the potatoes until you can easily stick a fork or knife through them. Drain and return to the pan.

If you like garlic and aren't afraid to get a large chunk, leave the cloves in. Otherwise, remove before mashing the potatoes. Mash the potatoes (and garlic if you left it in) and then add a couple tablespoons of butter and milk (about a half cup). Sprinkle in a pinch of salt, some pepper, a large sprinkle of garlic powder, and a little cayenne pepper. Mix thoroughly and taste. Adjust for taste by adding salt, pepper, garlic powder, and cayenne as needed. You may also need to add more butter and milk to make them creamier and achieve your desired texture.

Asparagus
Thank you birthday girl! Lastly, I made asparagus to add some green to the savory dinner:
  • One bunch of fresh asparagus
  • 1 Tablespoon Olive Oil
  • Garlic salt
  • Fresh ground pepper 
Asparagus usually have a tougher, denser, less edible end at each stalk. You can easily remove this part by taking the stalk and bending it around the bottom third or quarter of it. The end should snap off very nicely. Rinse all of the stalks and be sure to shake off all of the excess water. Heat the oil in a skillet large enough to fit the amount of stalks you are cooking, over medium heat. Saute the asparagus, turning frequently. Sprinkle on garlic salt and ground pepper to taste, about 1/2 teaspoon each is usually what I use. Continue to saute until stalks are tender. Be careful not to overcook; you want them to still have a good crunch when you bite into them.


There was also a tasty fall treat of a Pumpkin Cheesecake Roll for birthday dessert! I will post the recipe for that later this week.

A special thanks to my gracious brother-in-law for helping out with this special birthday dinner and for his wonderful description of how to prepare the ribs.

Happy Birthday sister wister!! I hope you loved your birthday dinner and I will always look forward to many many more! I also give you this wonderful gift of music for tonight's post...

Bon appetit! Buen provecho! Happy Birthday!

-Paula

Wednesday, October 5, 2011

Chop Me Up

We had a little discussion over dinner today and decided that a) we haven't been posting enough, b) we should try to remember the whole "food" aspect of the blog, and c) we like football players. Thus, we decided that today's post will be about food, but we'd also like to know if you like football players too. We're now well into football season, and there are definitely some hotties! So who's your favorite? Let us know, and we'll be posting about them in the next edition of Hungry for Men Wednesdays!

Now onto the food. While we love eating, sometimes figuring out what to cook can be a challenge. Sometimes you get stuck in a rut, and all you want to make is pasta or grilled chicken. Or pasta with grilled chicken. Our tactic lately has been to hit the internet and find recipes based on what ingredients we already have around the house. This was one such recipe, and it turned out to be pretty tasty, so we'd like to share it:

Mustard Pork Chops
Serves 3


Ingredients

  • 1 1/2 tablespoons cornstarch
  • 1 cup chicken broth
  • 1 tablespoon spicy brown mustard
  • Cooking spray or olive oil
  • 3 boneless, 1/2-inch thick pork chops
  • 1 cup sliced mushrooms
  • 1/2 cup sliced onion
  • 1/2 cup white wine (you know how we like to cook with wine!)
  • Salt and pepper
 
Preparation

Stir the cornstarch, broth and mustard in a small bowl until the mixture is smooth.

Spray a large pan with cooking spray, or add olive oil, and heat over medium-high heat. Salt and pepper the chops and then put them in the pan. Cook for 4-5 minutes on each side or until they're well browned. Remove the chops from the skillet. 

Reduce the heat to medium and re-spray/oil the pan. Add the mushrooms and onions and cook until they're tender.

Add the wine to the mushrooms and onions and let the alcohol burn off. Stir the broth and mustard mixture in. Cook and stir until it boils then return the chops to the skillet. Reduce the heat to low. Cover and cook for 5 minutes or until the chops are cooked through and the sauce has thickened. We served our chops with green beans, but you could also pair it with any other vegetable and/or rice.

There you have it! Easy, breezy. We can't wait to hear about your favorite football players! In the meantime, enjoy some music and a little nibble to satisfy your man hunger. 

Bon appetit! Buen provecho! Chop chop!

Mariana and Paula

Monday, September 19, 2011

Just Keep Swimming...

Sometimes, a Monday is so rough that the only comfort you have is food. Today was such a day, and so we turned to one of our favorites...

Seared Ahi Tuna with Wasabi Potatoes and Sauteed Spinach
(Why yes! We are fancy. Thank you for noticing).
Serves 4


Ingredients

4 Ahi tuna steaks
1 bag of pre-washed spinach leaves
4 medium russet potatoes
Wasabi
Butter
Milk
Salt
Pepper
White wine

Preparation

We purchased our ahi tuna at Trader Joe's. They come frozen in packages of two and are very decently priced. If we've never mentioned this, we love Trader Joe's.

Peel the potatoes and chop into eights. Boil in water with salt. When they start to fall apart, drain and return to the pot. Mash the potatoes, and then add a couple tablespoons of butter, a good squirt of wasabi, some milk, salt, and pepper. It's important that you get the measurements just right ;) Get out your handy hand mixer and whip! Sample and adjust for taste. If you like it spicier, add more wasabi. Add more milk and whip again if necessary, until the potatoes are light and fluffy.

In a wok or large pan, heat enough olive oil to coat the bottom.  Add in the spinach, doing it handful by handful until the entire bag is in the pan (it won't end up being that much). Splash a little white wine and sprinkle salt and pepper on the spinach. Sautee until cooked, which should take only a minute or two.

As you're doing that, heat another pan sprayed with Pam (or your favorite non-stick spray) until it's extra hot. Throw the tuna steaks on for about two minutes on each side, just enough time to heat it through while still leaving it pink in the middle.

Serve with a glass of the white wine and enjoy!

And for your entertainment...

Bon appetit! Buen provecho! Yummy!

Mariana and Paula

Tuesday, August 30, 2011

Spice Up Your Life

As you know, dear readers, food can often be used as a way to impress others, especially if you can whip something up that a lot of other people can't. Now in our family, this recipe is the most basic thing ever. We should be able to make it in our sleep, or with our eyes closed and one hand behind our back. In fact, we're pretty sure our Nana can do it in her sleep with both hands tied behind her. She can also tell you if you're using the correct pan by just the sound it makes when you set it down on the stove, but that's neither here nor there. The point is, that while our Nana might not be incredibly impressed by this specific recipe, others have been. So we are now passing it on to you... take it to a pot luck, offer it up at your house party, or make it for your future in-laws and we guarantee that the eaters will be impressed or your money back!*

*The writers of this blog would like you to note that you didn't actually pay for anything, hereby nullifying this guarantee. Sorry.

Roasted Salsa

Ingredients:
  • 3 medium tomatoes
  • 1 tomatillo
  • 1-2 jalapenos (depending on how spicy you like it)
  • 2 medium green chilies
  • 2 cloves of garlic
  • 2 slices of onion
  • 1 lime
  • Handful of cilantro
  • Salt to taste
Preparation:

Fire roast the tomatoes, tomatillo, jalapenos, green chilies, garlic, and one slice of onion. You can do this by holding them over the flame of your gas stove, putting them on the grill, or putting them in a cast iron pan on your electric stove.

Once the green chilies are roasted (the skin will start to blacken, crack, and peel) place them in a plastic bag to "sweat". This will allow you to be able to peel them later on.

Put all of the other roasted ingredients in a blender, add salt and pulse, so that everything is blended together but still slightly chunky. Pour into a bowl.

Chop the other slice of onion into larger pieces, and the cilantro. Take the green chilies out of their bag, peel the outer skin and slice open. Scrape out all of the seeds (rinse if you need to), and then chop. Mixed the chopped ingredients in with the blended ones, add a squeeze of lime, taste for salt (adjust if necessary), and you're done! Serve to your delighted guests with chips, or if you've grilled, suggest they top off their meal with it.

And if you really want to make an impression, offer up some music with your salsa. It's sure to stir up some emotions.

Bon appetit! Buen provecho! Yummy!

Mariana and Paula

Thursday, August 18, 2011

Peaches

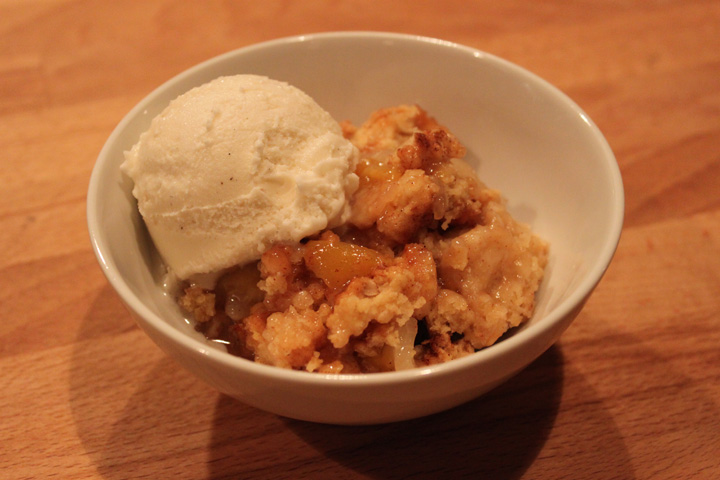
We're not sure where the idea to make peach cobbler came from, considering we've never made one before, but we decided that since we had some fresh peaches, we would make some fresh peach cobbler!! The recipe is pretty quick and easy and oh so yummy!

The making of this recipe had a fun little adventure to it. First, we decided that we would make personal little cobblers in ramekins for us instead of a regular large one. Mariana said she had four at her house so we were all set. We got started on the recipe and since there is only three of us eating this wonderfulness-the sisters and the obliged husband/bro-in-law- we halfed the recipe we found and made a small version... Or so we thought! As Paula sliced the peaches, Mariana began adding in some ingredients. Just to double check, Paula asked if Mariana was halfing the amounts listed so that we weren't making anything too sweet. Unfortunately, she hadn't! After trying to spoon off some of the excess ingredients, unsuccessfully, we rinsed off the peaches and started over! We also found that we didn't have four ramekins so we had switch to using a small glass baking dish.  Like we said, it was an adventure! But in the end, everything was straightened out and a wonderful cobbler was produced!

So if you would like to make this for just 4 people, remember to half the amount of ingredients listed! And if you want cute little personal cobblers, make sure you have enough little dishes to make them in! Otherwise, enjoy the amazing smell that will waft from the oven as you bake this and the celebration your taste-buds will give you for feeding them this heavenly wonder!

 Peach Cobbler
Serves 8
 

Ingredients

Filling
  • 8 fresh peaches - peeled, pitted and sliced into thin wedges
  • 1/4 cup white sugar
  • 1/4 cup brown sugar
  • 1/4 teaspoon ground cinnamon
  • 1/8 teaspoon ground nutmeg
  • 1 teaspoon fresh lemon juice
  • 2 teaspoons cornstarch
Topping
  • 1 cup all-purpose flour
  • 1/4 cup white sugar
  • 1/4 cup brown sugar
  • 1 teaspoon baking powder
  • 1/2 teaspoon salt
  • 6 tablespoons unsalted butter, chilled and cut into small pieces
  • 1/4 cup boiling water
  • 3 tablespoons white sugar
  • 1 teaspoon ground cinnamon
Preparation: 
Preheat oven to 425 degrees F (220 degrees C). 

In a large bowl, combine peaches, 1/4 cup white sugar, 1/4 cup brown sugar, 1/4 teaspoon cinnamon, nutmeg, lemon juice, and cornstarch. Toss to coat evenly, and pour into a baking dish. Bake in preheated oven for 10 minutes. 

While peaches are in oven, combine flour, 1/4 cup white sugar, 1/4 cup brown sugar, baking powder, and salt in a large bowl. Blend in butter with your fingertips until mixture resembles coarse meal. Stir in water until just combined. You should have a moist but still crumbly mixture. 

Remove peaches from oven, and drop spoonfuls of topping over them. Mix together the 3 tablespoons of sugar and 1 teaspoon of cinnamon and sprinkle entire cobbler. Bake until topping is golden, about 30 minutes. Once done, take out of oven a let cool for a little bit. Top with vanilla ice cream and enjoy!


As always, here is your wonderful music selection to go with this tasty dessert!

Bon appetit! Buen provecho! Yum Yum Yum!


-Mariana and Paula

Tuesday, August 9, 2011

Welcome to the Black Parade

It's Tuesday. You have the man hunger, but not enough time or energy to cook. So you think about cooking a standard grilled chicken, but it sounds so boring. No worries, it's the Vazquez sisters to the rescue! Try this recipe out to spice up a bland weeknight dinner:

Black Bean Chicken
Serves 3-4

Mariana learned this recipe at some point during college and it's always been a hit. Paula adopted it once she moved out of the house and it's also a favorite of hers. Best part? It's easy and requires very little actual cooking.

Ingredients:
  • 3 boneless, skinless chicken breasts
  • 1 can of black beans, drained
  • 1 small can of chunky salsa (We use Herdez' salsa "casera". We swear our dad buys it for us by the case)
  • 1/4 cup chopped cilantro
  • Sour cream
Preparation:

Cut the chicken up into even pieces, about 2 inches big each. Season the chicken with salt, pepper, and garlic powder and then sautee in olive oil.

Once the chicken is cooked, but before it starts getting too dry, add in the beans, salsa, and most of the cilantro. Let simmer for a while. If it's too watery leave it uncovered, but if it has a good consistency, cover it. The chicken is cooked, so you can simmer for just a while, but long enough that the chicken soaks up the yummyness.

Serve the chicken with beans, add a dollop of sour cream on top, and sprinkle the cilantro over it. Tadah! One delicious meal without much effort. Can't ask for much more!

We apologize for a lack of picture on this one. It was so delicious we ate it all before we remembered to take one. Oops! But we certainly didn't forget your music!

Bon appetit! Buen provecho! Yummmmm!

Mariana and Paula

Wednesday, August 3, 2011

Wrap Your Troubles in Dreams

Ah, so I know it took me a week to do it, but I'm finally doing it! I'm posting that yummy recipe that I mentioned last week! I came up with this while my sister was away last week on her honeymoon and I was just cooking for one. This is a pretty quick fix but full of lots of flavor and nutrition! And if you are making it for more, just multiply the amounts as needed!

Chicken Lettuce Wraps

Ingredients
  • 1 chicken breast, thawed
  • 1 can of black beans
  • 1 small Roma tomato, diced
  • 1 small avocado, sliced
  • 4 Romain lettuce leaves
  • Hummus of your choice (I used Trader Joe's tomato basil hummus)
  • Gorgonzola crumbles (Feta crumbles would also go very well!)
  • Seasoning for chicken
    • 1 tbsp Extra Virgin Olive Oil ("EVOO"-Compliments of everyone's favorite (NOT) Rachel Ray)
    • 1/2 tsp Garlic salt
    • 1/2 tsp Fresh ground pepper
    • 1/2 tsp Dried oregano
Preparation

Begin by cutting the chicken breast into about a half inch sections. Place chicken in a bowl and drizzle the EVOO over the chicken. Sprinkle the garlic salt, ground pepper and oregano and toss to cover the chicken well. Let marinate for about 15 minutes.
Grill chicken over medium heat on a skillet until it is no longer pink in the center. The good thing about slicing the chicken beforehand is that it cooks much quicker now. Be careful not to overcook it though! You want to make sure it is tender and juicy.
 Place the whole Romain leaves on a plate and spread a small amount of hummus on each one, about 1 tbsp. for each leaf. Next, add on a few slices of chicken (Now is a great time to a taste test of the chicken-for quality control purposes, of course!). Last, top each leaf with about a tablespoon of black beans, some of the diced tomato, a sprinkle of cheese crumbles and a few slices of avocado.
Starting with the top left and moving clockwise, you can see the layering of savory ingredients!
And that's it! You are ready to enjoy your delicious meal!

I actually ended up using only about half the chicken breast that I grilled and saved the rest for another quick meal for lunch the next day:
Take a pita, cut it in half and open up each half to create little pita pockets. Fill each half with your left over chicken, some black beans, diced tomatoes, sliced avocado and drizzle on a little dressing of your choice.

Your musical selection for this meal is a wonderful classic performed by an even more wonderful man!

Bon appetit! Buen provecho! Yum yum!

-Paula, the less tan and relaxed sister...

Friday, July 22, 2011

Last Mango in Paris

Our fans are demanding more recipes. What do they think this is, a food blog?! Sheesh. But we are nothing without our fellow foodies, so here goes...

While we love to eat, there are some days where we just don't really feel like cooking. Despite some initial hesitation from Paula, Mariana has taught her that there's nothing quite like a good rotisserie chicken to save you on these days. The possibilities are endless! Tostadas, chimichangas, Justin's favorite grilled chicken sandwiches, salads, and more. On this particular day we decided to get creative with our salad and came up with:

Mango Chicken Salad with Cilantro Dressing
Serves 2-4


The Ingredients:
  • One bag of baby greens
  • One chicken breast from a rotisserie chicken, shredded
  • One mango, chopped
  • 1/4 cup of sliced red onion
  • One large tomato, chopped
  • One large handful of cilantro (technical, huh?)
  • 1/2 large lemon
  • 1/3 cup extra virgin olive oil
  • 2 tablespoons plain yogurt
  • Salt

The Salad:

In a large bowl, throw in the baby greens (or whatever form of lettuce you prefer), the chicken, mango, red onion, and tomato. That's it. Your salad is done.

The Dressing:

In a blender, or in a handy Bullet like we used, combine the cilantro, juice from the lemon, olive oil, and a little salt. Blend until smooth. Add the yogurt and blend again. Check for consistency and taste, and adjust if necessary.

Pour dressing on salad and toss until well distributed. Serve and enjoy with a cool summer beverage like lemonade, iced tea, or mojitos.

One note on this recipe - we made it up. You may need to add more than the amounts we outlined above to make it just right. And on a related note, Mariana follows recipes and is very proud that she's learning to just make things up!

Don't forget about your music for the evening!

Bon appetit! Buen provecho! Yum!

Mariana and Paula

Monday, July 11, 2011

Shell Games

Stuffed Shells with Marinara Sauce
Serves 4-6

Our parents like to come up to Tucson on a fairly frequent basis. They do their shopping, and we eat together. This weekend my dad had just gone to the dentist and could only have soft foods so we decided to make stuffed shells, borrowing a basic recipe from Giada de Laurentiis and then making it our own. Ever the organized cooks, Paula took the lead with the shopping and the shells, and Mariana was in charge of the sauce. As you may have read on our About Us page, we get a big part of our love of food from our parents. However, this also means that while we are trying to be nice daughters and cook our parents a yummy and easily chewable meal, we have to repeatedly kick our mom or dad out of the kitchen!

The Ingredients:
  • 1 box of jumbo pasta shells
  • 2 tablespoons olive oil, plus extra for greasing
  • 3-4 Italian sausages
  • 2 teaspoons dried crushed red pepper flakes
  • 2 garlic cloves, minced
  • 1/4 cup chopped onion
  • 2 pinches of dried oregano
  • 24 ounces basic marinara sauce
  • 30 ounces ricotta cheese
  • 1 1/3 cups grated parmesan
  • 4 large egg yolks
  • 3 tablespoons chopped fresh parsley leaves
  • 3 tablespoons chopped fresh basil leaves
  • 1 cup shredded mozzarella cheese
  • Salt
  • Ground black pepper
  • Bottle of red wine

The Sauce:

In a large saucepan, start heating the olive oil. Slice or uncase the Italian sausage. We used turkey sausage in an effort to be healthier, but you can use any kind. Add to sauce pan and begin sauteeing. When it has almost finished cooking, add the onion and continue to sautee. Finally, add the garlic and finish cooking. Set aside in a bowl.

Keep the saucepan over the heat and add a couple splashes of your red wine. Let the alcohol burn off and then add the marinara sauce. Mix in the sausage/onion/garlic mixture, sprinkle in the red pepper flakes and oregano, and salt and pepper to taste. Simmer on low as you prepare your shells, mixing from time to time and adding more pepper flakes, oregano, or salt if needed.

The Shells and Stuffing:

Before you start the sauce, bring a large pot of water to a boil. Add salt to the water and then the shells. Cook for 6-7 minutes, so that the shells are partially cooked. They'll finish cooking in the oven. Once they're ready, remove from the water one by one with a slotted spoon so that they drain. Lay them out on a greased cookie sheet, making sure to keep them apart so they don't stick to each other.

In a large bowl, mix the ricotta, parmesan, egg yolks, basil, parsley, 1 1/2 teaspoons of salt, and a 1/2 teaspoon of pepper.

Preheat the oven to 350 F, and don't forget to check on your sauce!

Grease a large baking dish and then spoon in enough sauce to cover the bottom. Then take each shell and spoon in the ricotta mixture. Arrange the shells in the dish and then spoon the remaining sauce over them. Sprinkle the mozzarella over them.

Place the dish in the lower third of your oven and bake for 25-30 minutes, or until everything is heated through and the cheese on top is golden brown.

Serve, garnish with basil or parsley, and enjoy with a glass of red wine!


Bon appetit! Buen provecho! Yum!

Mariana and Paula

Bonus! A little music for your meal...